Important note: This article is written for A2 pulley injuries, but the rehabilitation concepts work for all pulley injuries. I’ve used it for anywhere from A1 to A5 issues in my patients/clients and recently for some A4 issues myself. This is also the same for lumbrical injuries and loading open hand, 3 finger drag, and pockets.
Important note 2: Self rehab is always AT YOUR OWN RISK! Medically, the best thing to do is to go to a orthopedic hand doctor, get a diagnostic ultrasound to assess the structural injury, and then go to a hand physical therapist or occupational therapist for rehab. Ideally, one that works with climbers. Although I am a physical therapist, this is a generalized article and I have not examined you personally. Thus, while many have used this article to rehab fully, I must reiterate again self rehab is at your own risk!
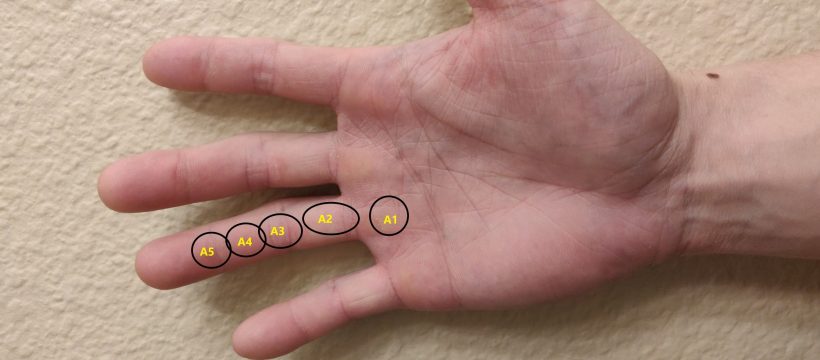
A1 to A5 pulley approximations shown above on the hand. The A2 is proximal to the PIP joint, and is one of the most often injured pulleys especially from half and full crimp.
There’s been much written on rehabbing finger injuries. One of the most prominent in Esther Smith’s Nagging Finger Injuries. I personally thought the article was very good, but it was a bit lacking in progression from Phase I to Phase II.
General timelines
- Mild overuse if a pulley starts to feel sore within a week and you catch it early and don’t aggravate it will generally only take a couple weeks up to a month of rehab.
- Moderate overuse where you’ve been working through pain for several weeks or possibly months will generally take within a range of 4 weeks up to 8-10 weeks to rehab
- Severe overuse will generally take a range of 1.5-2 months up to 3-5 months.
Most of the examples listed below are in the moderate overuse to severe overuse range which is why the timelines are longer. If you have a mild overuse scenario, most of the scenarios are sped up to where you will start with higher rehab weights and get back into light to moderate climbing a lot sooner. Hence, you will usually be back to moderate intensity climbing within a few weeks to a month or two.
Intro to injuries and phases
Phase I is very straight forward and good. Basically, the core of any injury is to regain these three things once an injury has occurred:
- Movement — movement of an injured area typically reduces pain (barring catastrophic injury) and helps to reduce any residual muscle stiffness or tension as the neurological system tenses up the area due to perceived threat.
- Full range of motion — ability of the injured area to be taken passively and/or actively to the edge of the range of motion. Basically, your injured fingers should be able to move passively and actively through your full range of motion as your uninjured fingers
- Mobility — ability to move the injured area through full range of motion actively with good control and typically under some load (but not enough for strength training purposes).
Check out the article above to see what stuff you can do there.
Frequency: Phase I stuff can be done everyday. Any loading like in Phase II is variable, but I tend to like 3x a week or every other day to allow the area to recover and minimize symptoms while building load tolerance. You also get better adherence to rehab if you don’t have to do something everyday.
Climbing or no climbing while rehabbing?
This is always a big question people ask, and there is no right answer. From what I have seen treating my own finger injuries and my patients is that it heavily depends.
- Sometimes people avoiding only the grips that hurt works
- Sometimes people can still climb moderately around flash level and be fine
- Sometimes people can climb 1-2 climbs below flash level and be fine
- Sometimes people can’t climb at all without aggravating the injury
In general, if you want to be safe, you should do the least as possible such as starting with jug ladders and build up, but for more severe pulley injuries I generally suggest only doing rehab for the first few weeks to build from the ground up and eliminate any aggravating factors. The big thing about any potential reaggravations that can happen is that they can make rehab take several weeks to several months longer if the injury gets badly aggravated again, so please play it safe. Everything is always at your own risk.
More about integrating climbing back into a routine later in the article.
Phase II is about understanding the concept of load tolerance. Injured tissues have often drastically reduced load tolerance compared to healthy trained tissues. One article that goes over this effectively is this one on finding optimal load. When we’re talking about load tolerance of injured tissues, the required dose of exercise to maintain its function, improve it’s function, and cause re-injury are all less than they were before. Thus, shifting the loading parameters to proper ones are key.
For example, let’s say we have a minor or moderate A2 injury where there was just overuse or maybe a slight pop but no obvious bowstringing which could indicate a major tear. Phase I should be started almost immediately if possible with movement over the first few days. Then over the next week working in full range of motion and mobility. Usually a week is a good indicator on whether you have mild injury — these tend to get better significantly over the course of a week to where you are at least 80-90%+ better. Moderate injuries tend to have less healing within that timeframe maybe up to 40-50% at most. Major injuries usually do not improve significantly over the course of a week or maybe minorly and usually need careful inspection by medical professionals and physical therapy.
Phase II concepts with introducing rehabilitation load tolerance are generally able to be introduced at this point (or even after a few days if a minor or moderate injury) at very low loads to allow the tissues to start to accommodate to small loads again. The loads are small enough that they should not cause any aggravation of the injury or any re-injury. In some cases, the loads may be very light in the range of 5-10 lbs or less at the start.
Loading the finger
First time I used kettlebell (KBs) and crimped the handle in half crimp. Second time I used a tension block to incrementally load weights. I didn’t get a pic of me crimping the Kettlebell handles, but I did get a phone of using a tension block with weight in half crimp. Pic below is a bit more than half crimp which is exactly 90 degrees at the proximal interphalangeal joints.
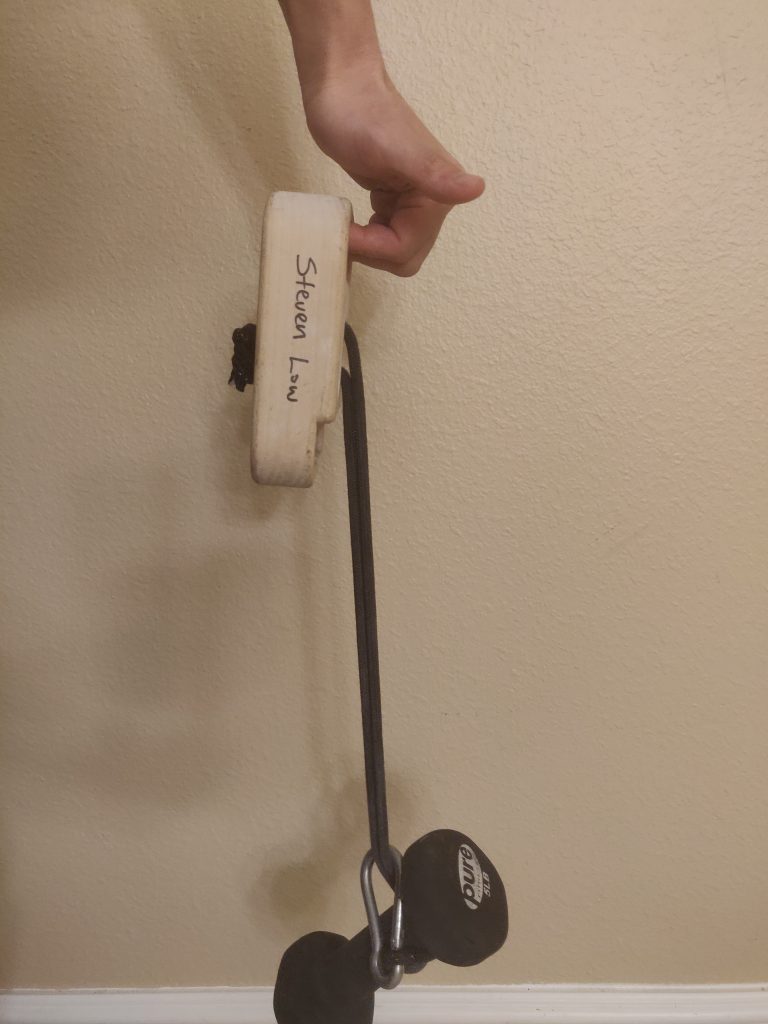
Here’s a video about tension block usage.
You can also use a hangboard to do this as well, but it’s usually harder because you can only hang half your weight on a hand (and some injuries are more severe than that) unless you are using a pulley system to reduce weight. This can work effectively too if you need to go that route.
I’ve also used finger rolls as a rehab tool as well because you can incrementally load the weight and modulating the sets and reps very easily. I initially tried finger rolls with both of my A2 pulleys, but both of them did not help as much as half crimping the KB handle or using a tension block to rehab for me. The load directly on the pulley seemed to be too much (so I could reduce the weight and volume), or just move to something that seemed more effective which I did.
There’s lots of options. Pick the best one for your situation (or your physical therapist’s recommendation).
Phase II examples
Rehabilitation for Left ring A2 pulley
I had a moderate left ring A2 pulley injury from overuse and “tweaking” it several times trying to go light on climbing for rehab. At this time, I couldn’t hang off one of the largest edges on the hangboard without pain, so I went to kettlebells for my choice of rehab advice. I barely climbed at all (was doing V8-10 before the injuries) and maybe warmed up to V4s and V5s as doing any V6+ climbs hurt and aggravated the pulley.
Starting: I started with the 8 kg (17.6 lbs) kettlebell (KB) and just did repeaters 2-3 sets of repeaters initially at 7 on/3 off for 6 rounds. That’s it. That was the rehab for the day.
Progressing: I slowly increased the sets over the next week or two to 4-5 sets (every other session progress) and stuck with the same weight. After I did that, I very slowly increased the weight since the KBs jump 4-8ish kg to the next one. I’d stick with the same weight of kettlebell for a session or two at the same weight to allow my pulley to accommodate to the loading stress. After that, I’d add in 1 sets of the next weight up while keeping the remaining 3-4 sets at the previous weight. Then I’d slowly decrease my sets of the lower weight while simultaneously increasing the sets of the previous weight every other session. This is what it would look like:
- 15 lbs 2-3 sets of 7 on / 3 off repeaters for 3 rounds. 3-5 minutes rest between sets. Every other session add in a set until 5-6 sets of 15 lbs 7 on / 3 off repeaters
- Once up to 5- sets, start progressing the weight. 1 set of 7/3 repeaters at 12 kg KB, 4 sets of 7/3 repeaters on 8 kg KB.
- Every other session or every session if it was feeling good, add another set at 12 kg KB and subtract a set at 8 kg KB. So 2 sets 12 kg plus 3 sets at 8 kg KBs… then 3 sets at 12 kg plus 2 sets 8 kg KBs… then 4 sets at 12 kg plus 1 set at 8 kg KBs… etc. until you’re fully on the 12 kg KB
- Then work your way up the KBs from there. I think the jumps I had were 8 kg, 12 kg, 16 kg, 20 kg, 24 kg, 32 kg, etc.
This slow progression allows the tendon to adapt over the course of several weeks to months to tolerate the loads again.
Symptoms: The pain generally decreased over time as I started low and worked my way up. I had acute pain and not chronic pain, which makes a big difference. The goal was improving FUNCTION and the pain will generally decrease over time. If there were any “tweaky” types of feelings in the finger or pulley I would back off some sets sometimes. If there was increasing pain after the session or the next day accompanied with a decrease in function, that would generally indicate that maybe the loads were a bit too high.
Generally, what I aimed for was that a bit of soreness was OK during the sessions, but I did not want to have any obvious pain or increasing pain during the session. If that meant I had to go back a couple times to lighter weights for the day so be it.
Other facets: Any weight I did with my “injured” hand I also did with my uninjured hand after so as to match volume and see how it was progressing compared to my healthy hand. Then I would work up to something heavy with my uninjured hand to maintain strength with it. Example: work up to say 50 lbs on 20mm half crimp repeaters for injured hand, and then keep raising the weight to 60, 70, 80 lbs for half crimp repeaters on my uninjured hand to maintain the strength.
Rehabilitation for Right ring A2 pulley
The right ring A2 pulley was injured minor-moderately from overuse after taking a few weeks off from climbing to finish writing the Tendonitis book (oh, the irony) and then coming back too fast. This time I was able to acquire a Tension block to use for rehabilitation purposes. Thus, instead of crimping KBs, I was able to clip on DBs and KBs to find precise weights to use.
Starting: This time I started with the 20 kg (~45 lbs) kettlebell (KB) and just did repeaters 5 sets of repeaters initially at 7 on/3 off for 6 rounds. I was able to do a much higher weight and start with a higher volume of sets this time around because it was not as bad as the other one.
Progressing: I used a similar progression, but making bigger jumps in progression every session.
- 45 lbs (20 kg) KB for 5 sets of 7 on / 3 off repeaters for 6 rounds. 3-5 minutes rest between sets
- Start progressing the weight. Every if it was feeling good, add another 1-2 sets at 24 kg KB and subtract 1-2 set at 20 kg KB. So 2 sets 24 kg plus 3 sets at 20 kg KBs… then 3 sets at 24 kg plus 2 sets 20 kg KBs… then 4 sets at 24 kg plus 1 set at 20 kg KBs… etc. until you’re fully on the 24 kg KB
- From there I worked in the 32 kg and then some combination of KBs to get back to full hand strength of 48+ kg.
This progression was much faster and only took about 2ish months to progress my way up this time with 20 kg to 48+ kg instead of the 4-5 month process that was when I had to start at the 8 kg -> 48 kg.
Symptoms: Same as last time. Since this injury was less severe, I was able to take the progression faster and the pain went away quicker this time. Generally, what I aimed for was that a bit of soreness was OK during the sessions, but I did not want to have any obvious pain or increasing pain during the session. If that meant I had to go back a couple times to lighter weights for the day so be it.
Other facets: Same as previous — Any weight I did with my “injured” hand I also did with my uninjured hand after so as to match volume and see how it was progressing compared to my healthy hand. Then I would work up to something heavy with my injured hand to maintain strength with it.
Integrating climbing again
This is a little bit trickier. Generally speaking, you need to stay below the threshold of injury and mainly just do extremely light climbing to warm up and avoid climbs that may possibly aggravate the condition.
With the left A2 ring, I was unable to do pretty much any climbing (open hand, half crimp, closed crimp, or pinch) for several months. Slowly the hand adapted over about 2 months of rehab where I was able to start working in a bunch of harder climbs in the gym (V6-8) instead of where I was starting at with V4-5. At month 3 I was able to start doing V6-7 with crimping and pinching. Month 4 I was able to start doing some V7-8 with crimping and pinching with the open hand at V8+, and month 5 I was fully back to working stuff again. There was a bit of lag in hand strength compared to my non-injured hand, but that’s to be expected.
With the right A2 ring, I was able to open hand the hardest climbs I could do still without aggravating the finger, but I was only able to do about V5-6 crimps and pinches without pain. After a month I was up to V6-7, and a few weeks after that V7-8, and a few weeks after that V8+ to normal. The progression was much more rapid after it got on track and started building up load tolerance from a relatively minor-moderate injury as opposed to a moderate-severe type of injury like the other one.
Basically, it depends. In some cases, you can keep climbing in while doing rehab and it gets better. In some cases, you can’t. Therefore, if you’ve kept in some level of climbing and your rehab is stalling then you should reduce the climbing intensity and volume or sometimes eliminate it for a couple weeks to ensure that you can keep improving with rehab to get back to full strength. Then add the climbing back in later.
Obviously, if you’re someone who has a lot of trouble sticking to a plan and not overdoing it, it’s far better to go slower with rehab and be conservative with climbing. Being very strict with the amount of climbing that you’re doing is going to be very important.
Updated 3/2024